c#
【WPF】WinodwやPageの見た目を継承する方法
Windowsフォームの場合は、何も考えずにFormのレイアウトを継承できます。
しかしWPFは少し観点が違います。
今日はラベルとボタンだけ設置したシンプルなPageを継承するサンプルを作ってみます。
カスタムコントロールの作成
継承元となる親デザインは、カスタムコントロールで作ります。
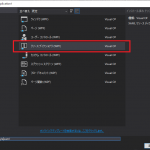
①ソリューションエクスプローラーでプロジェクトを右クリック
↓
②「追加」⇒「新しい項目」を選択
↓
③「カスタムコントロール(WPF)」を選択し、任意の名前に変更し、「追加」を選択
(ここではBasePage.csとします)

.csファイルの編集
追加したBasePage.csを開いて、デフォルトで継承されているControlを変更します。
Control
↓
Page
するとこうなります。
    public class BasePage : Page
    {
        static BasePage()
        {
            DefaultStyleKeyProperty.OverrideMetadata(typeof(BasePage), new FrameworkPropertyMetadata(typeof(BasePage)));
        }
    }
Generic.xamlの編集
カスタムコントロールを作成すると、追加した.csファイルとは別に、
{プロジェクトルート}\Themes\Generic.xaml が自動で生成されます。
処理は.csファイルに、デザインはGeneric.xamlに定義します。
日本語を使用する場合は、↓を先頭に追記してください。
<?xml version="1.0" encoding="Shift_JIS"?>追記しないと↓のエラーが出ます。
'指定されたエンコードに無効な文字があります。 行 15、位置 201。.' XML が無効です。
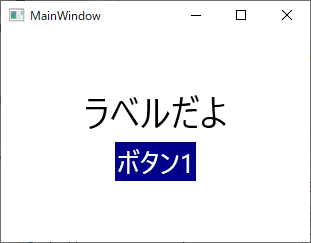
ラベルとボタンのみ配置したデザインを作成してみます。
<?xml version="1.0" encoding="Shift_JIS"?>
<ResourceDictionary
    xmlns="http://schemas.microsoft.com/winfx/2006/xaml/presentation"
    xmlns:x="http://schemas.microsoft.com/winfx/2006/xaml"
    xmlns:local="clr-namespace:WpfApplication1">

    <Style TargetType="{x:Type local:BasePage}">
        <Setter Property="Template">
            <Setter.Value>
                <ControlTemplate TargetType="{x:Type local:BasePage}">
                    <Grid>
                        <Viewbox OpacityMask="Black" HorizontalAlignment="Center" VerticalAlignment="Center" MaxHeight="80" Margin="0,-50,0,0">
                            <Label x:Name="label1" HorizontalAlignment="Center" HorizontalContentAlignment="Center" VerticalContentAlignment="Center">ラベルだよ</Label>
                        </Viewbox>
                        <Viewbox OpacityMask="Black" HorizontalAlignment="Center" VerticalAlignment="Center" MaxHeight="40" Margin="0,50,0,0">
                            <Button x:Name="button1" Content="ボタン1" BorderThickness="0" HorizontalAlignment="Left" VerticalAlignment="Top" Background="DarkBlue" Foreground="White" />
                        </Viewbox>
                    </Grid>
                </ControlTemplate>
            </Setter.Value>
        </Setter>
    </Style>
</ResourceDictionary>
継承元のクラスを変更
上記で作成したBasePageを継承するため、継承元を変更します。
PageChild.xaml
<local:BasePage x:Class="WpfApplication1.PageChild"
      xmlns="http://schemas.microsoft.com/winfx/2006/xaml/presentation"
      xmlns:x="http://schemas.microsoft.com/winfx/2006/xaml"
      xmlns:mc="http://schemas.openxmlformats.org/markup-compatibility/2006"
      xmlns:d="http://schemas.microsoft.com/expression/blend/2008"
      xmlns:local="clr-namespace:WpfApplication1"
      mc:Ignorable="d"
      d:DesignHeight="300" d:DesignWidth="300"
      Title="PageChild">
</local:BasePage>
PageChild.xaml.cs
public partial class PageChild : BasePage
{
    public PageChild()
    {
        InitializeComponent();
    }
}
これで完了。
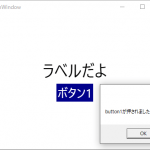
実行してみます。
無事表示されました。
継承する側のPageChild.xamlには上記のソースのとおり、何も記述していません。
類似するデザインが複数ある場合は使えると思います。
以上、WPFのデザインの継承でした。